← All 100 how-to guidesGUIDE 029 / 100
FRAMING & MOTION
How to stabilize shaky footage
DaVinci Resolve Studio 21.1 · Original practical guide
Stabilization trades some framing freedom for steadier motion. Begin with a restrained correction; removing every trace of camera movement can create unnatural distortion.
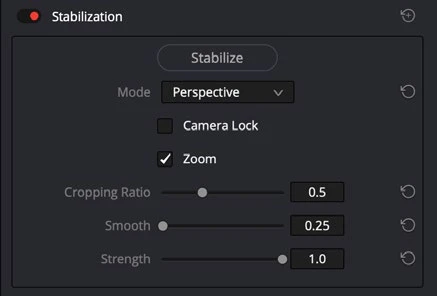
ACTUAL RESOLVE INTERFACEView full size ↗
Step by step
- Select the clip and expand Stabilization in the Video Inspector. Analyze the shot with Stabilize.
- Review the result, especially the frame edges. Compare Perspective, Similarity, and Translation modes when perspective warping is visible.
- Adjust strength and smoothing to retain intentional camera motion. Use Camera Lock only for a shot meant to resemble a locked camera.
- Check automatic zoom and cropping, then render a short section. Reanalyze if you change a setting that requires new tracking.
Check your result
The shot is calmer, the subject stays framed, and straight objects do not wobble unnaturally.
Technical reference: DaVinci Resolve 21.1 Reference Manual, Blackmagic Design, September 2026. Screenshot page numbers refer to that manual. Independently written guidance; specific controls may vary by platform and build. Authorship & image credits.