How do I…
do that in Resolve?
100 clear, hands-on guides for the moments you need an answer. Find your task, follow the steps, and get back to creating.
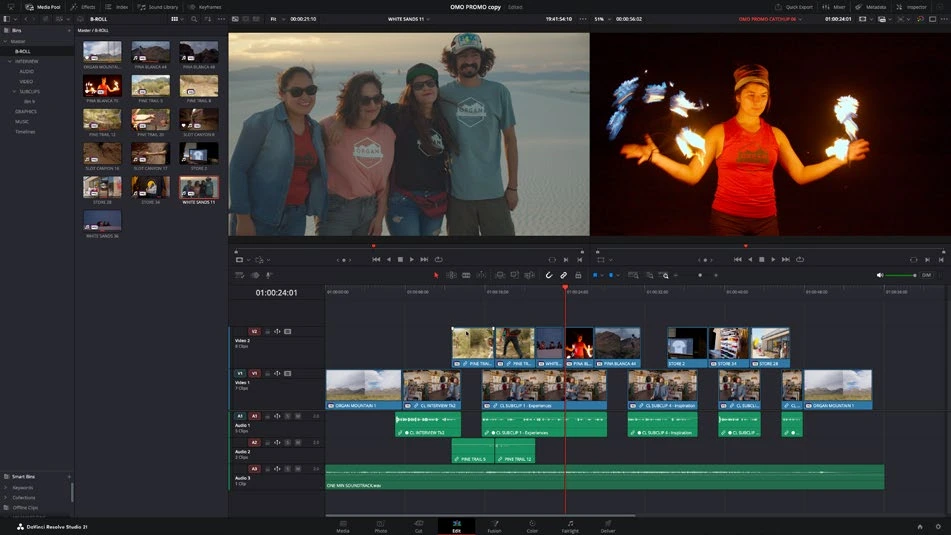 Inside the real Edit workspace ↗
Need a complete foundation? Follow the learning path. These standalone answers cover common search questions about editing, effects, sound, color, and delivery.
Find your next answer.
100 guidesImport video, audio, and images
Import puts references to your files in the Media Pool. It does not copy camera originals into the project, so give those files a permanent home before editing.
Read the guideOrganize footage with bins
Bins organize references inside a project. A simple structure for camera, dialogue, music, graphics, and timelines makes a growing edit easier to navigate.
Read the guideRelink missing media
Relink reconnects existing project clips to files at a new location. Start by confirming the drive and exact originals exist; a red offline image alone does not prove a broken path.
Read the guideChoose the right timeline frame rate
Set the intended delivery frame rate before editing. Changing clip interpretation, timeline rate, and export rate are different operations, with different effects on motion and sync.
Read the guideChange timeline resolution
Timeline resolution sets the working frame. It can differ from source resolution, but changing the shape also changes how crops, titles, and graphics fit.
Read the guideCreate and use proxy media
Proxies are lightweight stand-ins for editing demanding camera files. Keep the relationship to the originals intact so finishing can use the intended source quality.
Read the guideUse render cache for heavy effects
Render cache stores processed frames so Resolve can replay expensive effects. Unlike proxies, it addresses processing after source decoding rather than simply substituting easier source files.
Read the guideMake timeline playback smoother
Find the bottleneck before changing hardware or quality settings. Source decoding, storage, Fusion, grading, and monitoring can each produce similar-looking stutters.
Read the guideEnable Live Save and project backups
Live Save protects recent work, while project backups provide earlier recovery points. Neither is a substitute for copying your original media to separate storage.
Read the guideArchive a project with its media
A project export and a project archive serve different purposes. Use an archive when you need project data packaged with selected media for handoff or recovery.
Read the guideSplit a clip at the playhead
Splitting creates two editable timeline segments without altering the source file. Think about linked audio and track selection before making the cut.
Read the guideTrim the start and end of a clip
A trim changes how much of a source appears in the timeline. It is usually better than repeatedly splitting off tiny unwanted pieces.
Read the guideRipple trim without leaving a gap
A ripple trim changes a clip’s length and shifts later material. Use it when the sequence should become shorter or longer, rather than leaving empty timeline space.
Read the guideRemove a gap between clips
A timeline gap can be closed without manually dragging everything after it. Check whether the space is empty on every relevant track before collapsing it.
Read the guideInsert a clip without overwriting the edit
Insert adds a source range at the playhead and pushes later material along. Overwrite replaces timeline material for the duration of the incoming range.
Read the guideAdd markers and timeline notes
Markers make review notes findable. A clip marker follows its clip; a timeline marker belongs to a position in the sequence.
Read the guideDuplicate a timeline before a revision
A timeline duplicate preserves an edit version within the same project. It shares source media, so it is quick and does not double the footage on disk.
Read the guideCreate and unpack a compound clip
A compound clip wraps selected timeline elements into one editable container. It helps move a group together or apply processing to a combined result.
Read the guideAdd and manage timeline tracks
Tracks separate picture layers and sound roles. Higher video tracks usually cover lower tracks where their pixels are opaque; audio tracks are mixed through their routing.
Read the guideMake a J-cut or L-cut
A split edit lets sound lead or continue beyond a picture cut. It can make dialogue transitions feel natural without forcing picture and sound to change together.
Read the guideCrop a video
Cropping removes visible edges of a clip. It is different from changing timeline resolution, and it can reveal another layer underneath instead of automatically filling the frame.
Read the guideZoom and reposition a clip
Transform controls change a clip’s size and placement in the frame. A linked X/Y zoom preserves proportions; independent scaling can distort the picture.
Read the guideRotate or flip a video
Use rotation for orientation correction and flip for mirroring. Mirroring also reverses writing and can change the apparent direction of movement across a cut.
Read the guideAnimate a gentle zoom with Dynamic Zoom
Dynamic Zoom creates a pan-and-zoom move without placing transform keyframes manually. It is useful for a still image or a simple reframing move.
Read the guideMake smooth slow motion
Good slow motion starts with enough recorded frames. Optical Flow can synthesize intermediate frames, but complex edges and crossing objects can reveal artifacts.
Read the guideCreate a speed ramp
A speed ramp changes playback speed within a clip. Plan the action moment first so the acceleration serves a recognizable beat rather than feeling arbitrary.
Read the guideReverse a video clip
Reverse playback can create a reveal or make an action run backward. Check sound separately because reversed dialogue is rarely useful.
Read the guideFreeze a frame
A freeze frame holds one selected image for a chosen duration. Isolate the section you want to freeze so the rest of the action can remain moving.
Read the guideStabilize shaky footage
Stabilization trades some framing freedom for steadier motion. Begin with a restrained correction; removing every trace of camera movement can create unnatural distortion.
Read the guideReframe a landscape video for vertical delivery
A vertical version needs its own composition. Create the portrait timeline first, then decide how each subject and caption fits the narrower frame.
Read the guideAdd a simple text title
A basic Text title is the quickest way to add readable words. Keep styling modest while you solve wording, placement, and timing.
Read the guideUse Text+ for a more flexible title
Text+ is a Fusion-based title with more layout and shading controls. It is useful when a basic title cannot provide the animation or typography you need.
Read the guideCreate a lower-third name caption
A lower third identifies a speaker without competing with the interview. Prioritize name hierarchy and placement over elaborate motion.
Read the guideFix a missing or wrong title font
Projects usually reference installed fonts rather than embedding them. A substitute font can change line breaks, spacing, and the shape of an entire title.
Read the guideFade a title in and out
A simple fade can make text feel settled and unobtrusive. The fade should leave enough time at full opacity for the viewer to read.
Read the guideMake scrolling end credits
Credit rolls need readable typography and even motion. Their speed comes from the relationship between text length, travel distance, and clip duration.
Read the guideGenerate automatic subtitles
Automatic subtitles provide a first transcript, not finished captions. Proofreading, speaker meaning, and timing still need a human pass.
Read the guideImport an SRT subtitle file
An SRT contains caption text and timing, but not a complete visual design. Make sure its time base and start offset match your edited program.
Read the guideStyle subtitles consistently
Track-level styling keeps captions coherent and makes later changes easier. Use individual caption overrides only when there is a clear reason.
Read the guideBurn subtitles into a video
Burned-in subtitles become visible pixels in the movie and cannot be switched off by the viewer. Keep an uncaptioned master if you will need other language versions.
Read the guideAdd background music to a video
Music belongs on its own track so you can control its level, timing, and fades without disturbing dialogue. Use music you are licensed to include in the finished work.
Read the guideSeparate video from its linked audio
Linked clips normally select together to preserve synchronization. You can temporarily select them separately or permanently unlink them when the edit requires independent control.
Read the guideFade audio in and out
Audio fades prevent abrupt starts, clicks, and rough transitions. A fade should follow the sound’s purpose rather than use the same duration on every clip.
Read the guideAdjust clip volume and track levels
Clip volume balances individual recordings; a track fader changes their shared contribution to the mix. Use the two stages intentionally so later adjustments remain predictable.
Read the guideNormalize audio clips
Normalization applies calculated gain to reach a chosen measurement target. It does not automatically remove noise, repair distortion, or create consistent dynamics inside every sentence.
Read the guideReduce background noise with Voice Isolation
Voice Isolation can suppress unwanted sound around speech. The most useful setting is often less than maximum because aggressive processing can damage the voice.
Read the guideSync external audio using waveforms
Waveform synchronization compares sound shared by the camera and external recorder. It works best when both recordings contain a clear, overlapping reference.
Read the guideFix no sound during playback
Follow the signal from clip to speaker. Meters help separate a missing audio signal from a monitoring-device problem.
Read the guideDuck music underneath dialogue
Ducking lowers music while someone speaks. The control should respond to the dialogue source and recover smoothly during meaningful pauses.
Read the guideRecord a voiceover directly in Resolve
The Edit page voiceover tool provides a quick recording workflow. Establish a clean input and sensible level before recording a full narration.
Read the guideCorrect exposure with the primary controls
Exposure correction establishes a useful tonal foundation. Judge the subject and scopes together; forcing every shot to fill the entire signal range can destroy its intended mood.
Read the guideFix white balance and a color cast
White balance corrects an unwanted overall color bias. A genuinely neutral reference helps, but lighting can be deliberately warm, cool, or mixed.
Read the guideAdjust contrast without crushing detail
Contrast separates lighter and darker tones. Set it after the basic color pipeline and exposure are sensible so the control responds predictably.
Read the guideControl saturation without oversaturating skin
Saturation increases color intensity, but it should preserve believable relationships. Bright objects and skin can become distracting before the overall image looks obviously excessive.
Read the guideRead waveform and RGB parade scopes
Scopes measure image signals independently of how bright your room or monitor feels. Use them alongside the picture, not as a rule that every shot must resemble the same graph.
Read the guideInstall and apply a LUT
A LUT expects a particular input and produces a particular output. Using the wrong combination, or applying the same transform twice, can create clipped or strange-looking results.
Read the guideSet up color management for log footage
Color management separates source interpretation from the working space and display output. It makes mixed cameras easier to handle when each input is identified correctly.
Read the guideCopy a grade to another clip
Copying a grade accelerates a scene, but matching conditions still matter. A correction made for one exposure or lighting setup may need adjustment on the next shot.
Read the guideSave and compare a Gallery still
A Gallery still preserves a visual reference together with grade information. It helps you compare decisions across shots without relying entirely on visual memory.
Read the guideCreate a black-and-white grade
Black and white removes color but still needs tonal separation. Skin, clothing, and background can become similar gray values even when their original colors differ.
Read the guideIsolate an area with a Power Window
A Power Window limits a correction to a shape. Keep it on its own node so you can adjust the mask and the correction independently of the base balance.
Read the guideTrack a Power Window to a moving subject
Tracking moves an existing window with image features. A good starting frame and a suitable motion model usually matter more than repeated full-shot retries.
Read the guideBlur a face or license plate
An obscuring blur must remain effective throughout the shot. Review every frame where the sensitive detail appears, including transitions and motion-blurred edges.
Read the guideSelect a subject with Magic Mask
Magic Mask creates a subject selection using image analysis. Its usefulness depends on the edges, motion, and occlusion in the shot; the result still needs inspection.
Read the guideRemove a background with Magic Mask
A subject mask can drive transparency rather than just a color correction. This is useful for a cutout, but edge quality and the replacement background determine whether it looks convincing.
Read the guideReduce noise in low-light footage
Noise reduction can improve a shot, but too much processing removes texture or produces motion trails. Judge a moving, full-resolution sample instead of a paused thumbnail.
Read the guideSharpen a soft-looking shot
Sharpening increases edge contrast; it does not recreate missing focus. Use small changes and judge at the intended output size.
Read the guideMatch two shots in the same scene
A match is about the relationship across a cut: exposure, balance, contrast, and color intensity. The two images do not need identical scope shapes.
Read the guideUse a Color Space Transform correctly
A Color Space Transform converts between defined color spaces and transfer functions. Its place in the node tree matters as much as its settings.
Read the guideCreate a subtle vignette
A vignette can direct attention by changing the outer frame. Keep it soft enough that viewers notice the subject rather than a dark ring.
Read the guideCombine two images with a Merge node
Merge places a foreground over a background. Knowing the input roles makes a Fusion flow much easier to diagnose than connecting nodes by trial and error.
Read the guideAnimate a title in Fusion
A simple title animation needs clear start and end states. Build the readable static design first, then animate a small number of controls.
Read the guideEase animation with the Spline editor
Easing changes how a value travels between keyframes. It can make a move accelerate and settle without changing the basic start and end positions.
Read the guidePlace a transparent PNG over video
A PNG with an alpha channel can act as a logo or graphic overlay. A checkerboard baked into an image is not real transparency.
Read the guideRemove a green screen with Delta Keyer
A key separates the subject from a colored background. Clean lighting and a sharp source matter; no keyer setting can fully recover a subject hidden by spill or compression damage.
Read the guideTrack a flat surface with Planar Tracker
Planar tracking follows a textured surface and its perspective change. It is useful for signs, screens, and patches that move as a plane.
Read the guideReplace a screen in a moving shot
A screen replacement combines tracking, perspective, and image integration. A perfectly locked graphic can still look artificial if its brightness and sharpness ignore the plate.
Read the guideAnimate a polygon mask for rotoscoping
Rotoscoping traces a changing shape over time. Fewer well-placed points are easier to animate and usually produce smoother contours than a very dense outline.
Read the guideMake a reusable Fusion title template
A useful template exposes only the controls someone needs to change, such as text, color, and timing. Test it on a fresh timeline before treating it as reusable.
Read the guideFix a black or missing Fusion output
A Fusion viewer can display any selected node, while the Edit page uses the MediaOut result. Diagnose the actual output path rather than the last attractive preview.
Read the guideExport an MP4 video
MP4 is a container; H.264 or H.265 is the video codec inside it. For a broadly compatible review copy, begin with a simple H.264 export and verify the actual file.
Read the guideExport a video for YouTube
A good upload starts with a clean master at the intended frame rate and resolution. Platform processing may create additional versions, so keep your original export.
Read the guideExport a vertical video for social media
A portrait export should come from a reviewed portrait composition. The important work is keeping the subject and captions useful in the narrow frame.
Read the guideExport only part of a timeline
An In/Out range lets you render a section for review or a short deliverable. Remember to restore the whole-timeline range for the final master.
Read the guideExport timeline clips as individual files
Individual Clips renders separate timeline items instead of one combined movie. Use it for a defined handoff and test how your effects and transitions translate.
Read the guideExport audio only as a WAV file
An audio-only export is useful for a mix review or a delivery stem. The selected bus determines which sounds are included.
Read the guideExport a video with a transparent background
Transparency requires an alpha-capable codec and actual alpha in the image. Ordinary H.264 MP4 is not a suitable transparent master.
Read the guideExport an SRT subtitle sidecar
A subtitle sidecar keeps captions separate from the movie so viewers or platforms can switch them on and off. Plain SRT carries text and timing rather than your complete on-screen design.
Read the guideQueue several render jobs
The Render Queue lets you prepare multiple outputs before processing them. Each job should have a clear destination and a verified specification.
Read the guideReduce export file size without ruining quality
File size is mainly driven by duration and encoded bitrate. Reduce it by comparing short representative samples, not by changing every setting at once.
Read the guideRemove unexpected black bars
Black bars can come from aspect-ratio mismatch, clip scaling, output blanking, or bars already baked into the source. Identify which kind you have before cropping.
Read the guideFix media offline appearing only in an export
An export-only offline frame can involve original-media access, decoding, or stale intermediate files. First locate the exact failing frame in the rendered movie.
Read the guideInvestigate washed-out export colors
An export can look different because of transforms, data levels, metadata, or the player’s color management. Use a controlled comparison before altering the creative grade.
Read the guideRemove an unexpected Studio watermark
A Resolve watermark can appear when Studio-only processing is used in the free edition. Identify the effect and edition rather than attempting to hide the watermark in the image.
Read the guideFix dialogue playing in only one ear
A single microphone is often mono even when the recording container has two channels. Map the recorded channel correctly instead of treating silence on the other side as missing dialogue.
Read the guideDiagnose audio drifting out of sync
Constant offset and progressive drift are different problems. Measure the error at multiple points before moving clips or changing speed.
Read the guideTroubleshoot a render that fails at the same point
A repeatable failure position is useful evidence. Narrow the problem to a source, effect, transition, or output constraint before rerendering the entire film.
Read the guideRestore an earlier project backup
Restore into a separate recovery project so you can compare before replacing anything. A backup’s timestamp helps identify a useful state, but its contents still need checking.
Read the guideMove a project to another computer
A successful move includes media and dependencies as well as project data. Confirm the receiving machine’s Resolve version and capabilities before the handoff.
Read the guideReset a confusing workspace layout
A panel can disappear because of a layout, display, or workspace change. Restore the interface before assuming the project or media has been damaged.
Read the guideHow these guides were researched
Topics were selected from recurring public questions and search results about Resolve, including Blackmagic Design’s community forum. This is a practical editorial selection, not a ranking backed by keyword-volume data. Procedures were checked against the Resolve 21.1 reference manual; not every workflow has been executed on every supported platform.
All explanations are original. Interface images are genuine screenshots extracted from the reference manual and hosted here, with individual page credits. Some manual examples retain interface layouts from earlier editions. Platform, codec, and hardware options can differ. About the course and image sources.