← All 100 how-to guidesGUIDE 045 / 100
AUDIO & DIALOGUE
How to normalize audio clips
DaVinci Resolve Studio 21.1 · Original practical guide
Normalization applies calculated gain to reach a chosen measurement target. It does not automatically remove noise, repair distortion, or create consistent dynamics inside every sentence.
ACTUAL RESOLVE INTERFACEView full size ↗
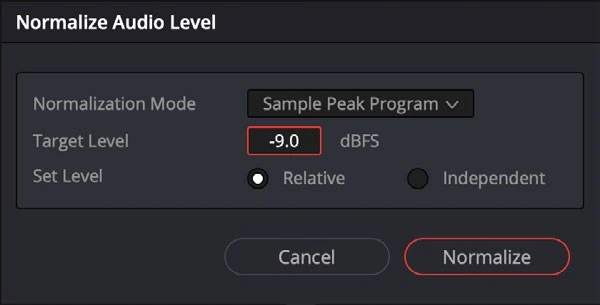
Step by step
- Select the audio clips that need a common starting level and right-click to open Normalize Audio Levels.
- Choose an appropriate peak or loudness-based mode. Enter a target suited to your workflow rather than copying a platform number without context.
- Decide whether each clip should be treated independently or whether their relative levels should be preserved together.
- Apply normalization, then listen across the edits and check peaks on the output bus. Refine dialogue with clip gain or dynamics where necessary.
Check your result
The clips start from a more useful level and the full mix still has adequate headroom.
← PREVIOUS GUIDEAdjust clip volume and track levelsNEXT GUIDE →Reduce background noise with Voice Isolation
Technical reference: DaVinci Resolve 21.1 Reference Manual, Blackmagic Design, September 2026. Screenshot page numbers refer to that manual. Independently written guidance; specific controls may vary by platform and build. Authorship & image credits.